Tag Archives: assignment 1

People & Place- Assignment 1

After some re-writes, contemplation and review, i’ve finally got assignment 1 ready.

Assignment Brief

Drawing together you experiences in completing the projects so far, take one person as a subject and create between five and seven different portraits.

These should differ in tope and style, and each be from a separate photographic session.

In your learning log:-

– Critically assess you finished work. Consider each portrait individually

– Identify what has worked well and what has been less successful and analyse the reasons for this

– Consider where you need to strengthen your own skills and understandings and explain how you hope to achieve this

Introduction

Edwards (2009) when writing his introduction says that ‘A portrait is about conveying mood- be it happiness, sadness, strength or vulnerability- but it must also create an emotional response in its viewers, so that they ask themselves who is this person, what is their story, and what were they thinking about when the photo was taken’ I wanted to use this assignment as an opportunity to get some photographs of my subject that were more than just snapshots taken while we’re out and about and while I don’t think my study has been extensive enough to cover a full range of emotions as mentioned by Edwards, I feel that I’ve captured happiness, certainly a sense of joy in images such as ‘the swing’ and moments of contemplation.

I’d planned to undertake this during a week’s holiday as I knew that I would have a camera of some description with me most of the time and that I could have different locations and poses due to the nature of the holiday. I tried to get a different mix to give me the widest choice available to select what I felt was the best images. The images were taken in and around Buxton and the Peak District and I used a combination of a Canon 7d and an Olympus EP1 Pen.

The Images

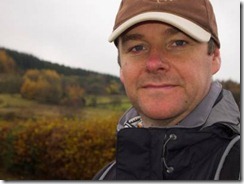
Image 1: Out Walking

This was taken during a walk on a dull and overcast day; I used the attached flash on the camera just to brighten the face under the cap, although I like the effect of the catch light in the subject’s eyes. For the composition I wanted to ensure the face was prominent in the frame but I also liked the background which while slightly out of focus, adds to the subject’s outdoor clothing and helps to add context to the image. I wasn’t concerned about losing some of the cap as I wanted the face to be both high and prominent in the frame to focus the viewer’s attention.

I was concerned that the sky at the top of the image was too white, however after some minor processing within Photoshop adjusting the tones of the image, the subtle colours within the sky are evident.

clip_image002

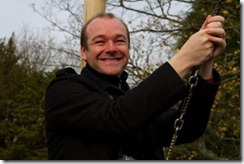
Image 2: The Swing

One of the benefits of my camera is the continuous shooting mode which enabled me to capture a series of images capturing the subject as he is preparing to launch himself on a tyre swing. After looking through the series, this is my favourite. It was taken mid morning on another dull day- the week was early November so this was expected, I used an additional flashgun and diffuser attached to the hot shoe just to add a little bit of extra light as the subject coat and the background were both quite dark. While I am aware that I need to be conscious of anything in the background that could disrupt the final image, I wasn’t overly concerned about the wooden pole as I wanted that connection with the chain, and while the viewer can’t see that its directly a swing, hopefully this with the expression might give the feeling that this is a fun portrait and activity. Even though the subject has their eyes narrowed a lot so that the pupils are not that obvious, I liked the natural smile, being from within a series of images, it captures the moment and personality which is what I wanted as while I was taking this seriously we had a laugh at the time.

clip_image004

Image 3: Phone Call

One morning before setting out for a day’s walking, my subject had to make a quick phone call and it was at that moment when they were distracted and writing an address down, that I captured this image. I like the colours, the bright colour of my phone, the orange and brown of the sofa echoing the orange of the top and the very natural pose and subject. I used the natural daylight that was coming in from the window and the door for this with no additional lighting. While it’s not a classic portrait, it shows a different side to the subject and when viewed within the context of the series, provides an interesting contrast to the rest.

clip_image006

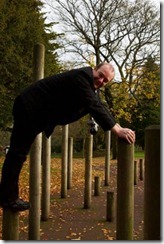
Image 4: Climbing Higher

Taken in the same location as the swing image, we’d seen these a few times while walking through the park and they looked interesting. While the park was empty, I wanted to take advantage of the props available and the subject liked these and decide to climb on them, the pose was accidental- he reached forwards to the other pole and I asked him to stay there while I took the shot, having to work quickly while the pose was not one that could be sustained. I like the full length pose with the shape contrasting with the upright pillars. I didn’t use flash for this, just the natural daylight.

clip_image008

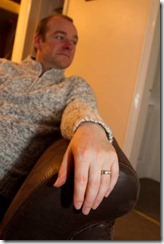
Image 5: Reflection

I’d been experimenting with a different type of portrait, either focusing on the face so that the hand was out of focus, or vice versa. It was taken indoors with halogen spotlights in the background and diffused flash on the camera pointed up slightly as I wanted it to bounce and not be direct on the subject. I chose a low angle as I wanted to focus on the hand and then use the arm to lead the viewer into the subjects face. I asked him to look away and made sure that I had the most neutral background available.

clip_image010

Image 6: Mine

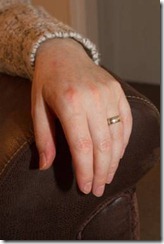
I’ve always liked the close up portraits that don’t focus on the subjects face but on something that stands out as different such as hands or feet, something that can be striking and an eye catching change. As I took the seated image focusing on the hand, this just struck me as a good subject to focus on and an image that I’d certainly like to keep if I was the customer. The lighting was halogen lighting with diffused flash and you can see from the slight shadow on the hand where the diffused light fell to, but it gives a shine on the wedding ring which to me is one of the most important focus points. The rest of the image is in quite neutral tones with the brown and creams that make the hand stand out against the armchair.

clip_image012

Thoughts

I have to admit that when I first started this module, I wasn’t feeling very confident about taking portraits, whether it was friend or stranger. I was aware that I needed to strengthen my skills and in part I did this with a supplementary course which enabled me to have access to people willing to act as models. While I feel I still have some way to go in feeling totally comfortable with strangers, when I have a willing subject I’m happy that I can direct them to ensure that I get the images I want. I‘d like to have more knowledge for different poses and what works well in different locations but this will come with experience and I plan to keep reading a wide variety of books and magazines both from my own collection and the library to help me to progress with this.

Undertaking this assignment was undoubtedly made easier by the fact that I planned this to coincide with a week’s leave enabling me to have enough time to take the images and not be rushed, to have a variety of different locations and backgrounds and for my subject to be relaxed which helped a lot. Earlier exercises where you maintain a rapport with your subject to keep them relaxed were vital in enabling me to keep the subject relaxed and I think this shows in some of the images where they are posed.

In reflection, I’ve read comments in the past that imply that in a portrait you see as much of the photographer as you do of the subject and after writing this assignment and reviewing my comments and the images, I feel that’s true. The subject is my husband so at starting this, I had an interest to produce images that were not only for this exercise, but also what I’d like to see in some extent, especially with ‘Mine’, and I’m sure that I will reflect on this as I progress and as I look back at my past work as my identity becomes stronger and move developed.

Bibliography & References

· Angier, Roswell (2007) Train your gaze: A practical and theoretical introduction to portrait photography. AVA Publishing

· Edwards, Rod (2009) Photographing people like a pro- a guide to digital portrait photography. David & Charles Publishing

· Freeman, Michael (2004) Photographing People. Ilex publishing

· Hope, Terry (2000) Portraits-Developing style in creative photography. Rotovision

DPP Assignment One: Workflow

Summary

Devise a themed assignment on a topic that interests you and in a field of photography with which you feel comfortable.

Use what you’ve learned to far to construct an effective workflow, all the way through to the final displayed image. Your work can be in the form of either prints or a web gallery.

List all the steps in your workflow with a commentary about what you did.

Assignment Background

For this assignment, I combined it with the previous exercise on editing as I felt that I’d be taking a number of images that could be used for both and that the editing I undertake for the assignment would also be the logical order that I would use in the exercise: editing.

My themed assignment, and one which I tend to come back to on a regular basis is wildlife photography based on a day at the zoo, I’ve used this before in previous assignments as I am always looking to improve my animal and zoo images, and I think this will be something that I continue throughout my photographic career.

I’ve broken the workflow down into the different stages and then into the steps under each for this assignment, and this logic would be applied to any future event that I was planning to photograph.

Pre-assignment


1) Define the scope Look at the assignment brief and decide that I want to focus on wildlife photography as that’s one of my specialisms
2) Choose location I consider the best places to go to that will meet my brief, it has to be somewhere I can get access to plenty of animals and for my own preference somewhere where I know so I can plan the route and what I want to photograph. I’ve narrowed this down to either Martin Mere or Chester Zoo. I chose Chester Zoo as I knew there were some new animals and that I would have more success with subjects there than at Martin Mere. I have a set route that I take and I know where the animals are that I want to see, so I will follow this on the day.
3) Plan kit As it’s the zoo, I know that I need to take my 100-400 telephoto lens as that’s what I’ll be using for the majority of the images, and my 100mm macro lens to use if the animal houses are quiet. As I’m walking around all day and taking the large lens I know that I have to use my Slingshot backpack to fit it in.
4) Kit preparation The night before I plan to undertake the assignment, I format my two 8gb memory cards, putting one in the camera and the other as a spare in my bag. I already have one charged battery so I put that in the camera and charge the other as a spare.

I mount the camera lens and then ensure that all the dust has been blown off and it’s been cleaned with lens fluid. I then check the smaller lens that I am taking with me and ensure that is ready to go, and put that one into my camera bag.

5) Settings Part 1 I test the camera to ensure its all working and to ensure that it’s set to manual mode (which I prefer) with centre weighted metering.

The camera is set to record in RAW to give me more flexibility. I will review the rest of the settings on the day. The camera then gets packed into my bag.

During the assignment


6) Settings Part 2 On arrival at the zoo, I make my way to the first location, once there I unpack my camera and check the rest of the settings, as the light is dull and cloudy; I set the white balance to cloudy and the ISO to automatic to save me from having to change this. The aperture is set at 5.6 which is my default preference and I alter the shutter speed manually. I will review the white balance and ISO throughout the day as the conditions change.
7) Location Part 1 I break the day down into parts so part one is the immediate part of the zoo. One this route there is plenty of scope to photograph different animals, and on this day I capture some images of the painted dogs sleeping. I work my way around the rest of the route managing to capture the capybara outside but being disappointed that the baby tapir is through dirty and reflective glass so I had to leave that one. This part of the route completes and I use a morning break to sit down and do a quick review of the images I’ve taken to see that I’ve managed to capture what I wanted, and if not to make a note to go back for another pass later on.
8) Location Part 2 I continue over to the further side of the zoo passing by the cheetah enclosure, unfortunately there is a big crowd around the three that are outside so I decide after waiting a few minutes to come back later, as I detour towards the butterfly house, I notice there is one cheetah on its own running about. I stop and wait for a few minutes in the hope it will come close enough for a photo and I get lucky as it decides to get playful and roll around in the dirt. Unfortunately I have obstructions of grass in front of me, so I hope that I can crop this out in post-production, or that it’s enough out of focus that it won’t create a distraction. I follow the rest of the route ensuring that I manage to capture the animals I wanted to see, I miss the butterfly house as its very busy and very humid. I don’t want to change my lens and wait for it to acclimatise as it’s that busy I don’t feel I can get the space to just wait for the butterflies. I know that I can go back on a weekday and it will be quieter so I move on deciding that the animal houses are too busy to do anything other than observe. I then move onto the giant otters who are swimming about too much for me, and then I see a large crowd gathering with the tigers so I make my way over and the two cubs are out being fed with their parents. I manage to get into the crowd but struggle to get decent images through the glass. I feel that I get something to work with, and that I might be able to use Photoshop to enhance these. I’ve realised that I have to accept the limitations of photographing through glass and after about 15 minutes, I move on to the lion enclosure where the male was out in the sun and I got some good profile shots.

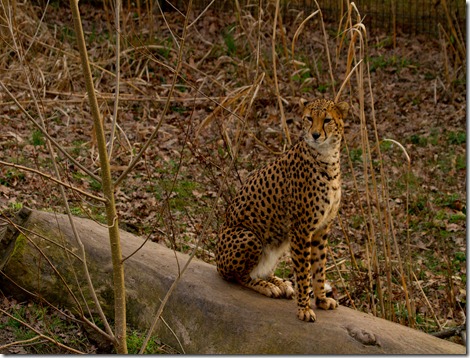
At this point in time it was nearing the end of the day and I started to head back, passing the cheetahs once again, and luckily there was one sat out, and the light was still golden so I managed to get a few clear images before the light started dipping and I headed back.

Post assignment


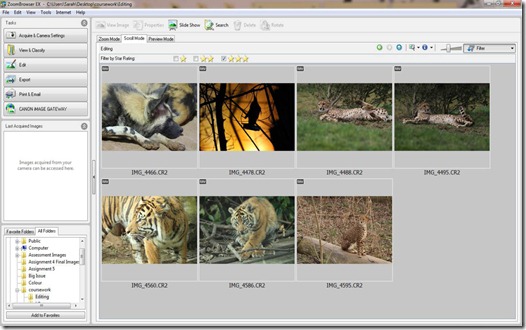
9) Download Once back home I download the 134 images onto my PC and also onto my laptop as backup into a new folder. As they are in RAW format, I use the Canon ZoomBrowser software to view and sort the images. I keep the data on the memory card and will only delete that when I need to reuse the card and once I’m happy that the images have been copied and stored safely.
10) Technical edit I view each image individually, using ZoomBrowser I enlarge the first image and then scroll through and giving each image a star rating to determine if I want to keep them. I can mark them from 1 to 3 stars and just for the sorting process I always use the 3 star. At this stage anything that is not technically accurate such as a blurred subject or where the animal has moved out of shot (possible with the cheetahs) will be marked as three star and then I review them in a separate window and if I am still happy, I then delete them. I will use the three star method again for the ones that I want to edit and work with later in the process.
11) The selects After I’ve deleted the images, I then review the first pass images to ensure that I’ve got the ones that I want to keep, and to see if I can reduce the numbers, deleting any duplicates or images that are very similar as I tend to have my camera on burst mode so I end up with a lot of very similar images, I edit them down to a couple of similar images for each of the topics.
12) Group and review After having a break of a day from the images, I have another look to ensure I’m happy and repeat the selection edit if appropriate. I find that having a break and looking at something else, or doing other photography helps to clear my mind and I find I can be a bit more ruthless at deleting images, otherwise I’d have hundreds and no storage space for them.
13) Final choice Once I have my final choice, I save these in a different folder with an appropriate name where I will keep the RAW files and also converted JPGS once I have reviewed them. I keep the seconds in a generic zoo folder as I might want to come back to them at a later date.
14) Edit I use Adobe Photoshop Elements 9 to edit and process my images. I open each image and usually only have to tweak the settings. I increase the level of the blacks and saturation slightly to give the images some more punch, I then open the image. If it needs a crop, I’ll then try different crops, or on some I will try a conversion to monochrome. I will then save the image as a high quality jpg.
15) Print or publish I review the processed images and while I might not actually print them at the time, I might make a note to use one in a calendar or to publish on my website when it’s due for an update.
16) Storage & Archiving Once I’m happy with the final images, I will transfer them off my PC onto my external HDD. I also regularly review and backup images to DVD.


Findings

I think that my workflow might differ from other peoples as I tend to break it down into very defined steps and maybe go a little too granular, but I like a clear path of actions to follow. With regards to adaptations, I have a couple for the way I take and produce my photographs. Firstly one adaptation is the time I spend selecting and editing, I tend to only delete the obvious ones to start with, then I tend to ensure I have gaps in between selecting and deleting in order to ensure that I don’t just get click happy and delete everything. While it does mean it takes a little longer and I tend to keep copies of the images for longer, sometimes I can have something that could work with some work, so instead of a tweak in Photoshop, I might look to convert it to black and white and add a crop for example. The second adaptation is how I review the images as I go along, I tend to take then check the image on the screen, and if it’s something that I really want to get right, and can do, I will try again. As my photography tends to revolve around a day long event, I ensure that I have a quick image review when I have a break, that way I’m still on location if I need to revisit something, although with animals it doesn’t always work- but it did on this day as earlier on, I couldn’t get a good composition of the cheetahs, later on as I was getting ready to head back they were sat out in the sun and still as statues! I also tailor my plan of the day depending to whether I’ve been to the location before, as regular visits tend to have a routine so I can go to where I want to be for the best images first.

My workflow current uses ZoomBrowser for viewing and then Photoshop Elements 9 for editing, I have used the Canon DPP software for editing, but I prefer Photoshop for the whole process. I am considering a move over to Lightroom, and was planning on purchasing this before I undertook this assignment; however I’ve decided to hold off with the introduction of Lightroom version 4 beta to see when a proposed release data will be for this. (Note since writing this post Lightroom 4 has been released and I am currently evaluating it with a view to purchasing it)

Final Images

Out of the number images, I’ve gone through the editing process and these are my chosen seven images that hopefully show a different viewpoint to a usual animal in a zoo image.

final selection


View albumView albumView albumView albumView albumView album

Painted Dogs

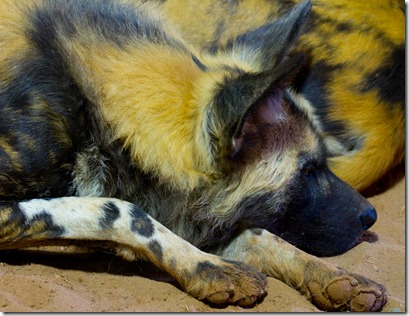
I increased the blacks and the contrast to account for the fact that I took the image through glass, and then I cropped it slightly to focus on the sleeping animal.

Painted Dog_4466

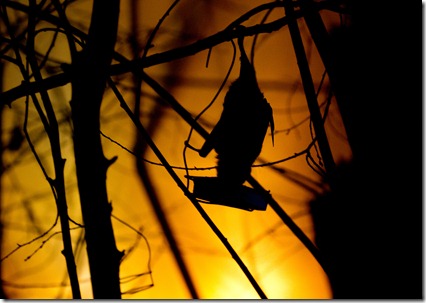
Bat

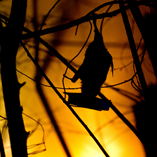
I increased the blacks slightly, I left the rest of the colour tone alone and just added some sharpening as it was a soft image on the bat as it was moving around eating from the bowl. I like the silhouette and the colours as you don’t often see an image of a bat. At Chester flash isn’t allowed and I relied on low light and the yellow sunlight on one side of the enclosure to provide enough light for me to capture this image.


Bat_4478

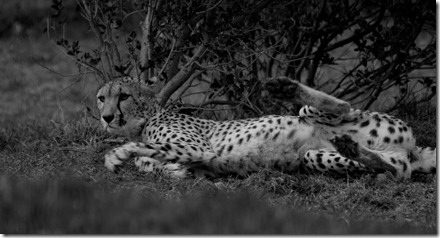
Cheetah 1

I increased the blacks and the contrast, then I cropped it to remove some of the out of focus grass in the foreground, but I kept some as its important to keep it in the right context and look like it’s a natural environment. I then converted it to black and white as I felt it worked better.

Cheetah 1_BW_4488

Cheetah 2

I increased the contrast slightly and the blacks, then just added some minor sharpening, and cropping the image to make it more focused on the animal.

Cheetah 2_4488

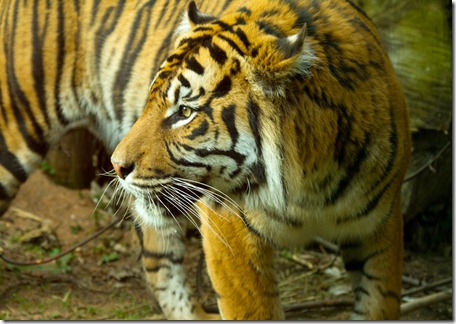
Tiger

For this I increased the saturation and vibrance, dropping down the brightness to remove some the glare that had come through the glass, and this gave a more even histogram.

Tiger_4560

Tiger Cub

I increased the saturation and vibrance to bring the fur up to a more realistic colouring compared to what I saw on the day and increased the blacks to reduce the glare. While tempted to crop it, I wanted to keep the environment included.

Tigercub_4586

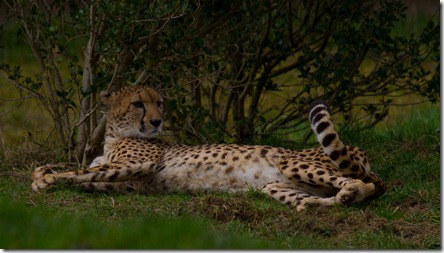
Sitting Cheetah

I just increased the saturation and the blacks on this, I tried a crop but I liked the space around the subject as I feel that you look around the image to see the cheetah.

Sitting Cheetah_4595